Subsections of Basics
Weasis Architecture
Weasis has a modular architecture based on OSGi: the dynamic module system for Java. It uses the Apache Felix OSGi framework which is an open source implementation of the OSGi specification.
The following schemas show the main different plug-in types (bundle in OSGi language) and their relationships. Viewer, Viewer Tool Pane, Tool Bar, Data Explorer and Codec bundles are registered dynamically by the Declarative Services (a way to push or to consume services in OSGi environment).
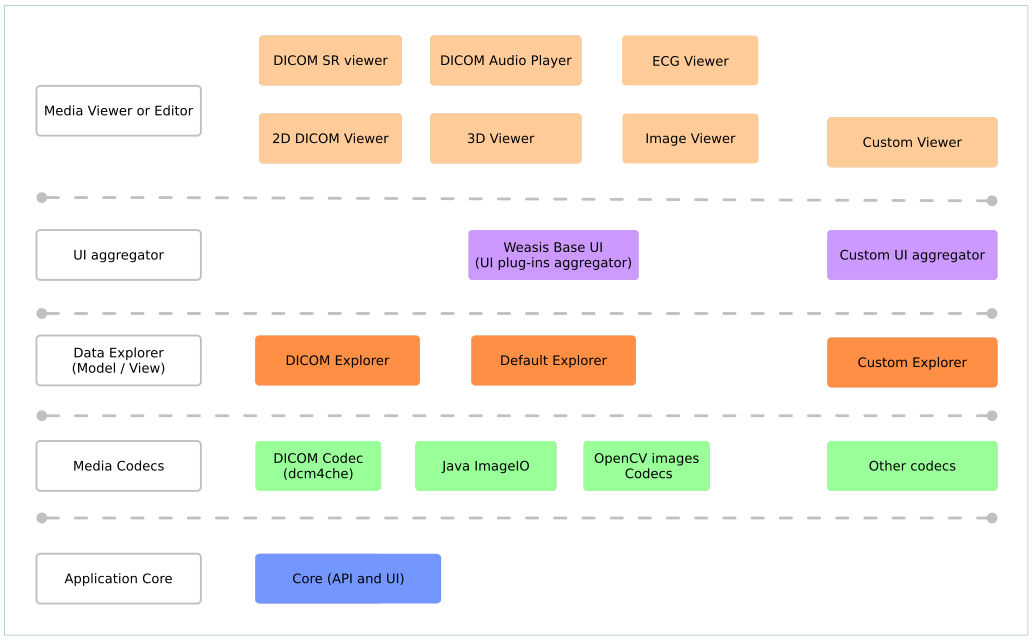
For each bundle, translation files are packaging in a separated bundle ending by “i18n” called a bundle fragment (OSGi concept) which is merged during runtime to the application. In this way, translation can be handled separately and they are automatically loaded by the application when they are available.
Some Codec bundles also have bundle fragments. Those fragments contain native libraries (JNI wrapping). The Weasis launcher enables downloading and loading only the native binaries related to the running platform.
Shortcuts
Keyboard and Mouse Shortcuts
IHE recommendations in Basic Image Review profile.
Central panel containing viewers and editors
| Shortcut | Action |
|---|---|
| Ctrl + Tab | Select the next tab (since v4.2.1 ) |
| Ctrl + Shift + Tab | Select the previous tab (since v4.2.1 ) |
| Ctrl + Shift + E | Open a the docking panel list for selection |
| Ctrl + M | Maximize/Restore the selected tab |
| Ctrl + W | Close the tab |
| Tab Right-click | Open the contextual menu for more options |
Selected view of the 2D DICOM Viewer
| Shortcut | Action |
|---|---|
| Left Arrow | Display previous series (since v4.2.1 ) |
| Right Arrow | Display next series (since v4.2.1 ) |
| Page Up | Display first series (since v4.2.1 ) |
| Page Down | Display last series (since v4.2.1 ) |
| Ctrl + Left Arrow | Display previous study (since v4.2.1 ) |
| Ctrl + Right Arrow | Display next study (since v4.2.1 ) |
| Ctrl + Page Up | Display first study (since v4.2.1 ) |
| Ctrl + Page Down | Display last study (since v4.2.1 ) |
| Up Arrow | Display previous image (since v4.2.1 ) |
| Down Arrow | Display next image (since v4.2.1 ) |
| Home | Display first image (since v4.2.1 ) |
| End | Display last image (since v4.2.1 ) |
| Shift + Up Arrow | Go 10 images back (since v4.2.1 ) |
| Shift + Down Arrow | Go 10 images forward (since v4.2.1 ) |
| Ctrl + Up Arrow | Display previous patient (since v4.2.1 ) |
| Ctrl + Down Arrow | Display next patient (since v4.2.1 ) |
| Ctrl + Home | Display first patient (since v4.2.1 ) |
| Ctrl + End | Display last patient (since v4.2.1 ) |
| Tab | Go the next view when layout has more than one view |
| Shift + Tab | Go the previous view when layout has more than one view |
| Alt + Arrows | Move image of 5 pixels (since v4.2.1 ) |
| Alt + Shift + Arrows | Move image of 10 pixels (since v4.2.1 ) |
| Ctrl + Plus (+) | Zoom in (since v4.2.1 ) |
| Ctrl + Minus (-) | Zoom out (since v4.2.1 ) |
| Ctrl + Enter | Set zoom to best fit (since v4.2.1 ) |
| T | Translate (pan) the image canvas |
| W | Window / Level |
| S | Series scroll |
| Z | Zoom |
| R | Rotation |
| H | Crosshair: in multiview mode synchronizes the crosshair position to all the views (Note: Ctrl + click or Ctrl + Shift + click allows changing the Window / Level values) |
| C | Cine Start / Stop |
| M | Measure |
| D | Distance measurement |
| A | Angle measurement |
| Y | Polyline measurement |
| B | Textbox |
| Q | Context menu |
| Ctrl + Spacebar | Change to the next action |
| Ctrl + mouse drag | Accelerate the current action |
| Ctrl + Shift + mouse drag | Accelerate more the current action |
| Alt + R | 90° rotation (clockwise) |
| Alt + L | 90° rotation (counterclockwise) |
| Alt + F | Flip horizontally (after rotation action) |
| 0 1 2 3… | DICOM presets |
| K | Toggle key image state |
| Spacebar | Show/Hide all the annotations (three states) |
| I | Show/Hide all the annotations (three states) |
| Escape | Reset the selected view |
| P | Print view(s) with the operating system printer |
| Right-click | Open the contextual menu for more options |
| Double click | Toggle fullscreen |
| Drag files/directories (from the OS file manager) |
Open DICOMs files |
DICOM explorer
| Shortcut | Action |
|---|---|
| Ctrl + click on the thumbnail | Select multiple series |
| Click on a thumbnail and then Shift + click on another one | Select all series between |
| Ctrl + A | Select all the series |
| Home or Page Up | Select the first series |
| End or Page Down | Select the last series |
| Up Arrow | Select previous series |
| Down Arrow | Select next series |
| Enter | Open the selected series in the default viewer |
| Click + drag a thumbnail in the main view | Display a series |
| Right-click | Open the contextual menu for more options |
| Drag files/directories (from the OS file manager) |
Open DICOMs files |
Note
Downloading Priorities: Selecting a thumbnail gives the best priority to download.
Graphics
| Shortcut | Action |
|---|---|
| Click on a graphic | Select a Graphics |
| Click + mouse drag | In selection mode: select all the graphics inside the selection area. In drawing mode: draw the selected graphic shape. |
| Ctrl + A | Select all the graphics |
| Ctrl + D | Deselect all the graphics |
| Delete | Delete the selected graphics |
| Shift + click on a graphic | In selection mode: add or remove a graphic to the current selection. In drawing mode: force to draw on another graphic (without shift the graphic is selected). |
| Double click | Stop adding points for polyline (also available in the context menu) |
| Right-click | Open the contextual menu for more options |
Tips and Tricks
Window / Level:
- Horizontal movement of the mouse to the right will widen the window width (flatten the perceived contrast)
- Vertical movement of the mouse upwards will lower the window center (increase the perceived brightness). See Preferences to inverse level direction.
Two ways to draw a segment:
- Click + drag > release
- Click > release > drag > release
Customize
Subsections of Customize
Integration
How to launch Weasis from any environments
Here we present how to launch Weasis with associated images from any context either using weasis-pacs-connector or by building your own connector. The launch of the application is based on the weasis protocol available since Version3.5.3.
Using weasis-pacs-connector allows a high degree of integration and facilitates connection to a PACS. Here are some of the advantages:
- Automatically build a manifest according to a configuration with a PACS
- The initial URL starts with HTTP and is then redirected to weasis:// (as weasis:// is not allowed by wiki, blog…)
- Manages to build the manifest simultaneously with the start of Weasis (Loading time optimization)
- The URL returns a manifest ID which can be requested only once (and must be consumed within 5 min)
However, it is also possible
- To build your own connector for particular integrations
- To let Weasis querying DICOMWeb services directly.
Note
Requires Weasis installed on the system with the native installer.
Use weasis-pacs-connector
For connecting to dcm4chee web interface, follow the instructions in Installing Weasis in DCM4CHEE. Otherwise, refer to the documentation of weasis-pacs-connector.
Standard workflow when connecting Weasis to a PACS, RIS, EMR, EPR or any web interface:
Note
The schema above shows that the queries to the PACS are made at the same time as the viewer starts. This makes it possible to optimize the launch by simultaneously launching weasis and building the manifest.
Tip
weasis-pacs-connector services allow either to build a manifest from a PACS via DICOM C-Find or to upload the manifest by http POST.
Build your own connector
This documentation describes how to create your own connector without weasis-pacs-connector and with different DICOM archive types. The weasis protocol allows you to build URIs to launch Weasis according to different configurations and allows to load DICOM files locally or remotely.
Here are examples with XML manifests or with DICOMWeb RESTful services.
Build an XML manifest
Use $dicom:get to load a XML manifest returned by your service.
$dicom:get -w "https://myservice/manifest?studyUID=2.16.756.5.5.100.397184556.14391.1373576413.1508"Build an XML file containing the UIDs of the images which will be retrieved from Weasis. There is XLS to validate the content of xml. This output file can be either compressed in gzip or uncompressed. Here is an example:
<?xml version="1.0" encoding="UTF-8" ?>
<manifest xmlns="http://www.weasis.org/xsd/2.5" xmlns:xsi="http://www.w3.org/2001/XMLSchema-instance">
    <arcQuery additionnalParameters="" arcId="1001" baseUrl="http://archive-weasis.rhcloud.com/archive/wado" requireOnlySOPInstanceUID="false">
        <Patient PatientID="H13885_9M" PatientName="TEST NON SQUARE PIXELS" PatientSex="F">
            <Study AccessionNumber="" ReferringPhysicianName="" StudyDate="20130711" StudyDescription="TEST NON SQUARE PIXELS" StudyID="PKD" StudyInstanceUID="2.16.756.5.5.100.397184556.14391.1373576413.1508" StudyTime="170013">
                <Series Modality="US" SeriesDescription="NON SQUARE PIXELS: PIXEL ASPECT RATIO" SeriesInstanceUID="1.2.40.0.13.1.1.87878503032592846377547034671833520632" SeriesNumber="2">
                    <Instance InstanceNumber="107" SOPInstanceUID="1.2.40.0.13.1.1.126082073005720329436273995268222863740"/>
                </Series>
                <Series Modality="MR" SeriesDescription="NON SQUARE PIXELS: PIXEL SPACING" SeriesInstanceUID="2.16.756.5.5.100.397184556.7220.1373578035.1" SeriesNumber="40001">
                    <Instance InstanceNumber="1" SOPInstanceUID="2.16.756.5.5.100.397184556.7220.1373578035.1.0"/>
                    <Instance InstanceNumber="2" SOPInstanceUID="2.16.756.5.5.100.397184556.7220.1373578035.1.1"/>
                    <Instance InstanceNumber="3" SOPInstanceUID="2.16.756.5.5.100.397184556.7220.1373578035.1.2"/>
                    <Instance InstanceNumber="4" SOPInstanceUID="2.16.756.5.5.100.397184556.7220.1373578035.1.3"/>
                </Series>
                <Series Modality="MR" SeriesDescription="NON SQUARE PIXELS: PIXEL SPACING" SeriesInstanceUID="2.16.756.5.5.100.397184556.7220.1373578664.2" SeriesNumber="50001">
                    <Instance InstanceNumber="1" SOPInstanceUID="2.16.756.5.5.100.397184556.7220.1373578664.2.0"/>
                    <Instance InstanceNumber="2" SOPInstanceUID="2.16.756.5.5.100.397184556.7220.1373578664.2.1"/>
                    <Instance InstanceNumber="3" SOPInstanceUID="2.16.756.5.5.100.397184556.7220.1373578664.2.2"/>
                    <Instance InstanceNumber="4" SOPInstanceUID="2.16.756.5.5.100.397184556.7220.1373578664.2.3"/>
                </Series>
            </Study>
        </Patient>
    </arcQuery>
</manifest>
Note
Important Parameters (except mandatory parameters defined in xsd):
PatientBirthDatehelps to identify a patient.StudyDate,StudyTime,Modality,SeriesNumberandInstanceNumberhelp to sort data before downloading images.SeriesDescriptionandStudyDescriptionallow immediately displaying the descriptions before downloading the images.
Tip
From Weasis 2.5 it is possible to have multiple archives (allows several arcQuery tags) and the presentations tag which contains the image annotations.
Build an XML manifest (no WADO server)
This example requires only a WEB server. Weasis will download DICOM files by URLs.
Use $dicom:get to load a XML manifest containing direct links Launch
$dicom:get -w "https://nroduit.github.io/demo-archive/Lumbar/mf.xml" Note
Required Parameters:
DirectDownloadFiledefines the URL of the DICOM file to download (the final URL is the combination of wadoURL + DirectDownloadFile)DirectDownloadThumbnaildefines the URL of the JPEG file representing the series (the final URL is the combination of wadoURL + DirectDownloadThumbnail)- See in the previous note above.
Download directly with DICOMWeb RESTful services
This integration requires a PACS/VNA with DICOMweb services (QUERY/RETRIEVE) where the requests are managed directly by Weasis. Here are some of the advantages:
- Straightforward integration
- Do not require to install weasis-pacs-connector
- Allow passing token directly in headers (not in the URL)
The following configurations allow images to be loaded by initiating the request from a WEB context. However, it is possible to access DICOMWeb services by initiating the request directly from the Weasis import.
Use $dicom:rs to load DICOM files. Here are some configuration examples of DICOMweb applications:
dcm4chee-arc-light
This configuration requires at least dcm4chee-arc-light 5.22.2 and Weasis 3.6.0. To activate Weasis in dcm4chee-arc-light user interface, you need to add the four following properties in the web portal from the left menu Configuration > Devices > dcm4chee-arc > Extensions > Edit extension > Child Objects > Web Applications > DCM4CHEE
IID_PATIENT_URL=weasis://$dicom:rs --url "{{qidoBaseURL}}{{qidoBasePath}}" -r "patientID={{patientID}}" --query-ext "&includedefaults=false" -H "Authorization: Bearer {{access_token}}"
IID_STUDY_URL=weasis://$dicom:rs --url "{{qidoBaseURL}}{{qidoBasePath}}" -r "studyUID={{studyUID}}" --query-ext "&includedefaults=false" -H "Authorization: Bearer {{access_token}}"
IID_URL_TARGET=_self
The properties can also be passed directly to the docker-compose.env file:
IID_PATIENT_URL=weasis://$dicom:rs --url "{{qidoBaseURL}}{{qidoBasePath}}" -r "patientID={{patientID}}" --query-ext "\&includedefaults=false" -H "Authorization: Bearer {{access_token}}"
IID_STUDY_URL=weasis://$dicom:rs --url "{{qidoBaseURL}}{{qidoBasePath}}" -r "studyUID={{studyUID}}" --query-ext "\&includedefaults=false" -H "Authorization: Bearer {{access_token}}"
IID_URL_TARGET=_self
Finally, refresh the page for having the viewer button.
Warning
Configuration notes:
- See configuration for versions before 5.22.2.
- From 5.24.0 {{qidoBaseURL}} must be replaced by your base URL (e.g. https://pacs2.test.com:8443)
- The character ‘&’ must be escaped in the Docker environment variables.
- The Authorization header is not required for unsecure service.
- URL with HTTPS requires a real valid certificate; otherwise, the certificate must be imported into the Weasis Java keystore. For testing purposes in secure mode, you can use the HTTP URL if it is mapped in the OIDC client of keycloack (–url “http://
:8080/dcm4chee-arc/aets/DCM4CHEE/rs”).
Note
Known issue: Weasis cannot open the images because of the token length which is cut by IE and Chrome only under Windows. It is working with Firefox on Windows.
Orthanc WEB Server
https://www.orthanc-server.com/static.php?page=dicomweb
$dicom:rs --url "https://demo.orthanc-server.com/dicom-web" -r "patientID=ozp00SjY2xG"Currently, the DICOMWeb service of Orthanc doesn’t support:
- Thumbnail service is not implemented.
Google Cloud Healthcare API
https://cloud.google.com/healthcare/docs/how-tos/dicomweb
$weasis:config pro="dicom.qido.query.multi.params true" $dicom:rs --url "https://healthcare.googleapis.com/v1beta1/projects/chc-nih-chest-xray/locations/us-central1/datasets/nih-chest-xray/dicomStores/nih-chest-xray/dicomWeb" -r "studyUID=1.3.6.1.4.1.11129.5.5.184301693334578016850836775758484230512396" -H "Authorization: Bearer <your-token>"Currently, the DICOMWeb service for getting thumbnails doesn’t work in the Google API.
Note
<your-token> must be replaced by a valid token.
DICOMcloud (for Azure cloud)
https://github.com/DICOMcloud/DICOMcloud
$dicom:rs --url "https://dicomcloud.azurewebsites.net/api" -r "studyUID=1.3.6.1.4.1.14519.5.2.1.4429.7055.198257099234774234268879426857" Note
The demo server is no longer accessible.
Currently, the DICOMWeb service of DICOMcloud doesn’t support:
- Thumbnail service is not implemented.
Preferences
The WEB distribution (weasis.war) allows delivering preferences from the server-side to the client-side. Some preferences on the server-side are used by Weasis only during the first launch because they can be changed later in the Weasis user interface. The other preferences at the server-side are used by Weasis at every launch.
Local preferences can be changed by:
- The Weasis user interface: File > Preferences
- The weasis protocol with the command weasis:config and the pro parameter
Preferences on the server-side can be changed by:
- Replacing ext-config.properties which extends and overrides config.properties, see the tip below.
- Using query parameters in weasis-pacs-connector
- The weasis protocol with the command weasis:config and the pro parameter
Tip
How to modify ext-config.properties:
- Unzip weasis.war, modify the file and zip it again.
- It is also possible to change the default location of ext-config.properties with the Java property “felix.extended.config.properties” with the parameter
cdb-extof the weasis service. The ext-config.properties file can also be placed in a plugin package, see How to build and install a plug-in.
Priority order for loading a property
Here is the priority order to set a property:
- Java System property providing from parameters of weasis:config or the launching URI)
- Property defined in weasis/conf/ext-config.properties or in weasis/conf/config.properties
- The default value of the property (see table below)
Example to change language property (It will work only during the first launch of Weasis on a user session, otherwise delete ${user.home}/.weasis/preferences/).
- If you are using weasis-pacs-connector, add the property
locale.lang.code:http://localhost:8080/weasis-pacs-connector/weasis?patientID=9702672&pro="locale.lang.code%20fr_CH" - Add the property in weasis/conf/ext-config.properties:
locale.lang.code=fr_CH - The default value is “en_US”
List of preferences
- GUI: if yes, the property can be modified in the Weasis user interface.
- Type: F: only caught at the first launch of the viewer. A: always caught by the viewer. AP: always caught by the viewer but only from ext-config.properties or config.properties .
| Property | Default value | GUI | Type | Description |
|---|---|---|---|---|
| weasis.confirm.closing | false (since v2.0.0 ) | yes | F | Show a message of confirmation when closing the application. |
| weasis.show.disclaimer | true | no | A | Show a disclaimer (requires to be accepted to start the application) during the first launch of Weasis. |
| weasis.show.release | true (since v2.0.0 ) | no | A | Show a message when the release has changed |
| weasis.export.dicom | true (since v1.2.5 ) | no | A | Allows exporting DICOM files. |
| weasis.portable.dicom.cache | true | no | A | Cache the images imported from directories defined in weasis.portable.dicom.directory. If true, it is similar to the WEB import. |
| org.apache.sling.commons.log.level | INFO | yes | F | Sets the logging level of the loggers. This may be any of the defined logging levels TRACE, DEBUG, INFO, WARN, ERROR. |
| org.apache.sling.commons.log.file.activate | false | yes | F | Activate the log file. If this property is false, log messages are written to System.out. Since Weasis 2.0.4 |
| org.apache.sling.commons.log.file.number | 5 | yes | F | The number of rotated files to keep. |
| org.apache.sling.commons.log.file.size | 10MB | yes | F | Defines how the log file is rotated by size. |
| org.apache.sling.commons.log.pattern | {0,date,dd.MM.yyyy HH:mm:ss.SSS} *{4}* [{2}] {3} {5} | no | F | Formatting log messages. java.util.MessageFormat pattern supporting up to six arguments: {0} The timestamp of type java.util.Date, {1} the log marker, {2} the name of the current thread, {3} the name of the logger, {4} the debug level and {5} the actual debug message. |
| locale.lang.code | en | yes | F | Language code (see Java Locale). If the value is “system” then the locale of the operating system will be used (client-side). |
| locale.format.code | system | yes | F | Format code for number and date (see Java Locale). If the value is “system” then the locale of the operating system will be used (client-side). |
| weasis.name | Weasis | no | AP | Change the name of the application everywhere in UI |
| weasis.profile | default | no | AP | Application profile, it allows having a custom preferences directory on the client side (will not shared preferences with other Weasis instances) |
| weasis.resources.url | ${weasis.codebase.url}/resources.zip | no | A | Application resource files (logo, presets, LUTs…). “resources.zip” is downloaded again only when the last modified date has changed. |
| weasis.download.immediately | true | yes | F | Start to download series immediately |
| download.concurrent.series | 3 | no | A | The number of concurrent series downloads |
| download.concurrent.series.images | 4 | no | A | The number of concurrent image downloads in a series |
| audit.log | false | no | A | Audit log for giving statistics about usage of Weasis |
| weasis.color.wl.apply | true | yes | F | Allow to apply Window/Level on color images |
| weasis.dicom.root.uid | 2.25 | no | A | Set value for dicom root UID when creating DICOM objects (KO or PR). See company list. |
| {ui keys} | true | no | A | Make visible or not the Toolbars, Tools, some buttons, main menu and context menu items (see ext-config.properties file) |
| weasis.aet | WEASIS_AE | no | A | Calling AETitle for DICOM send and DICOM print |
| org.apache.sling.commons.log.stack.limit | 3 | yes | F | Defines the maximum number of lines for stack trace (0 => NONE, -1 => ALL) |
| weasis.export.dicom.send | true | no | A | Allows DICOM send. Is always false when weasis.export.dicom=false. |
| weasis.import.dicom | true | no | A | Allows importing DICOMs |
| weasis.import.dicom.qr | true | no | A | Allows DICOM Q/R. Is always false when weasis.import.dicom=false. |
| weasis.acquire.meta.global.display | PatientID,PatientName, PatientBirthDate, PatientSex, AccessionNumber, StudyDescription | no | A | Global tags at the patient or study level that are visible in Dicomizer |
| weasis.acquire.meta.global.edit | StudyDescription | no | A | Global tags which are editable |
| weasis.acquire.meta.global.required | PatientID, PatientName, AccessionNumber, StudyDescription | no | A | Global tags which are required for publication |
| weasis.acquire.meta.series.display | Modality, OperatorsName, ReferringPhysicianName, BodyPartExamined, SeriesDescription | no | A | Tags at the series level that are visible in Dicomizer |
| weasis.acquire.meta.series.edit | ReferringPhysicianName, BodyPartExamined, SeriesDescription | no | A | Series tags which are editable |
| weasis.acquire.meta.series.required | Modality, SeriesDescription | no | A | Series tags which are required for publication |
| weasis.acquire.meta.image.display | ImageComments, ContentDate, ContentTime | no | A | Tags at the image level that are visible in Dicomizer |
| weasis.acquire.meta.image.edit | ImageComments, ContentDate, ContentTime | no | A | Image tags which are editable |
| weasis.acquire.meta.image.required | ContentDate | no | A | Image tags which are required for publication |
| weasis.acquire.dest.host | localhost | no | A | Hostname of DICOM send destination for Dicomizer. If no value, the list of DICOM nodes for storage is displayed. |
| weasis.acquire.dest.aet | DCM4CHEE | no | A | AETitle of DICOM send destination for Dicomizer |
| weasis.acquire.dest.port | 11112 | no | A | Port of DICOM send destination for Dicomizer |
| weasis.acquire.meta.study.description | Pictures of follow-up,Pictures of observation,Pictures preoperative,Pictures intraoperative,Pictures postoperative | no | A | Comma-separated list of study description elements. Comment this property to have a free text field. |
| weasis.acquire.meta.series.description | no | A | Comma-separated list of series description elements. Comment this property to have a free text field. | |
| weasis.level.inverse v2.6.0 | true | yes | F | Inverse level direction (moving the cursor down to increase brightness) |
| weasis.apply.latest.pr v2.6.0 | false | yes | F | Apply by default the most recent Presentation State to the related image |
| weasis.user v2.6.0 | system user | no | A | Defines a user with its own preferences |
| weasis.pref.store.local.session v3.5.3 | false | no | A | Store user preferences when weasis.user is not specified (only with remote preferences service) |
| weasis.theme v4.0.0 | org.weasis.launcher.FlatWeasisTheme | yes | F | FlatWeasisTheme is the default dark theme. All the themes comes from FlatLaf |
| weasis.theme.${system} v4.0.0 | org.weasis.launcher.FlatWeasisTheme | yes | F | Apply a default theme specific to the platform (macosx, linux, windows). |
| flatlaf.uiScale v4.0.0 | 1.0 (or the default scale factor of the Operating System) | yes | F | Specifies a custom scale factor used to scale the user interface. Allowed values: e.g. 1.5, 1.5x, 150% or 144dpi (96dpi is 100%) |
| weasis.update.release v4.0.1 | true | no | A | Show a message when a new release is available |
Examples of properties in ext-config.properties
Changing the default theme of the user interface
# Define the theme for the first launch according to the platform (macosx, linux, windows)
weasis.theme=org.weasis.launcher.FlatWeasisTheme
weasis.theme.macosx=com.formdev.flatlaf.FlatIntelliJLaf
weasis.theme.linux=com.formdev.flatlaf.FlatDarculaLaf
Customize resources
The default resources are located:
- For the web distribution in “resources.zip” at the root of weasis.war (see above how to set a new URL for resources)
- For the installed distribution in installedPath/app/resources
How to add DICOM nodes or DICOM printers at the server-side
- From the graphical user interface, configure the DICOM printers from File > Print > DICOM Print or DICOM nodes from File > Preferences > Dicom node list
- Go to the folder ${user.home}/.weasis/data/weasis-dicom-explorer
- Copy the desired configuration files: dicomNodes.xml, dicomPrinterNodes.xml, dicomWebNodes.xml and dicomCallingNodes.xml
- Paste at the root path of resources. For web distribution, unzip, place files and zip again.
- The new configurations should appear for all the users as non-editable configurations in Weasis
Build Plug-ins
How to build and install a plug-in
This page describes how to build new Weasis plug-ins and how they can be incorporated into the distributions, see also this page for the IDE configuration.
List of plug-ins types
- Media viewer or editor (main central panel that implements
ViewerPluginorImageViewerPluginand the factory implementsSeriesViewerFactory) - Toolbar associated with a viewer (implements
Toolbar) - Tool associated with a viewer (right panel that implements
DockableTool) - Data Explorer (data model implements
DataExplorerModeland data view implementsDataExplorerView, and the factory implementsDataExplorerViewFactory) - Import data into an explorer (ex.
ImportDicomand the factory implementsDicomImportFactory) - Export data into an explorer (ex.
ExportDicomand the factory implementsDicomExportFactory) - DICOM editor or viewer for special modalities (
DicomSpecialElementFactoryandSeriesViewerFactory), see weasis-dicom-sr - Media codec (implements
Codec) - Preferences (implements
PreferencesPageFactory) - UI aggregator. This is the application main user interface bundle. The maven artifact of this bundle must be defined in config.properties (ex. weasis.main.ui=weasis-base-ui)
Tip
See the Weasis Architecture to understand the plug-in hierarchy.
Build plug-ins from Maven archetype
- From the folder Weasis/archetype execute: mvn install
- Generate a sample project by executing the following command: mvn archetype:generate -DarchetypeCatalog=local
- Select the archetype:
- weasis-plugin-base-viewer-archetype (example of a toolbar and a tool for the non DICOM viewer)
- weasis-plugin-dicom-viewer-archetype (example of a toolbar and a tool for the DICOM viewer)
Note
From Eclipse: File > New > Maven Project and Search for weasis archetype in catalog filter.
From Intellij: File > New Project > Maven, select the “Maven Archetype” generators and select a Weasis archetype from Default local catalog.
Tip
In the pom.xml of the new plug-in, the tag <relativePath> must be adapted to your relative path of Weasis sources.
The default value is <relativePath>../Weasis/weasis-parent/pom.xml</relativePath>
Install plug-ins
Warning
This documentation has not been updated since version 4.2.0 where the properties configuration files have been replaced by json files.
The way to add plugins will also evolve soon with the new weasis-manager component.
For the installed distribution
The file “app/conf/ext-config.properties” must be adapted and plug-ins must be placed in the directory “app/plugins”.
Example with weasis-isowriter:
-
Add in app/conf/ext-config.properties:
felix.auto.start.85=${weasis.codebase.url}/plugins/weasis-isowriter-2.6.1.jarTipIf you want to use another directory for a plugin on your computer, you should use one of the following properties:
On Windows:felix.auto.start.85=file:///C:/path/to/weasis-isowriter-2.6.1.jar
On linux:felix.auto.start.85=file:///home/Username/path/to/weasis-isowriter-2.6.1.jar
On macOS:felix.auto.start.85=file:///Users/Username/path/to/weasis-isowriter-2.6.1.jarTipFor not modifying the current ext-config.properties create a new file and add to the launcher the following VM argument:
-Dfelix.extended.config.properties="file:///your_plugin_path/myplugin-config.properties" -
Place the file “weasis-isowriter-2.6.1.jar” in the directory “/weasis/plugins”
For the WEB distribution
Build a new war file containing the plug-ins and the ext-config.properties file.
-
Build “weasis-ext.war” with the following structure:
weasis-ext/ ├── conf/ │ ├── ext-config.properties ├── WEB-INF/ │ ├── web.xml ├── plugin1.jar └── plugin2.jar -
In /weasis-ext/conf/ext-config.properties, add the plug-ins references:
felix.auto.start.85= \ ${weasis.codebase.ext.url}/plugin1.jar \ ${weasis.codebase.ext.url}/plugin2.jarNoteUsing
${weasis.codebase.ext.url}allows you to keep the base URL abstract, so moving the package to another server won’t be a problem. Otherwise absolute URLs must be used. The default value of${weasis.codebase.ext.url}is ${weasis.codebase.url}-ext. -
weasis-ext is the default web context when launching Weasis, using another web context requires modifying the property weasis.ext.url, it can be done by:
weasis.ext.url=${server.base.url}/weasis-newext -
Changing the property in weasis-pacs-connector configuration.
NoteIt is also possible to add the code base for plugins (cdb-ext) directly in the URL:
http://localhost:8080/weasis-pacs-connector/viewer?patientID=9702672&cdb-ext=http://localhost:8080/plugins/weasis-ext
Tip
For debugging a specific configuration: add to the launcher the following VM argument:
-Dfelix.extended.config.properties="http://server:port/weasis-ext/conf/ext-config.properties
An example that makes a package of weasis-isowriter plugin:
- Build “weasis-ext.war”:
    weasis-ext/
    ├── conf/
    │   ├── ext-config.properties
    ├── WEB-INF/
    │   ├── web.xml
    └── weasis-isowriter-2.0.3.jar
Build OSGi services
All the plug-in type described in the list above are OSGi services that are registered and aggregated in the GUI. Building the plug-in from the Maven archetype will configure the OSGi service automatically. For adding new OSGi services, here is the procedure:
-
Create a class implementing one of the plug-in types and add at least the annotations @Component and @Service, for instance:
@Component(immediate = false) @Service public class SamplePrefFactory implements PreferencesPageFactory { ... }TipFor more information about annotations see the Apache Felix SCR Annotations.
-
Add in pom.xml of the plug-in the maven-scr-plugin (to generate XML file from the Java annotations) and the property for loading any XML file in maven-bundle-plugin:
    <build>
    <plugins>
     <plugin>
        <groupId>org.apache.felix</groupId>
        <artifactId>maven-scr-plugin</artifactId>
     </plugin>
     <plugin>
        <groupId>org.apache.felix</groupId>
        <artifactId>maven-bundle-plugin</artifactId>
     </plugin>
    ...
Weasis Commands
The commands listed below can be applied at start-up or in a telnet session. All the commands starting with “dcmview2d:” allow you to drive Weasis and are not adapted to be used at start-up.
Info
This page matches to Weasis 3.5.1 or higher. The syntax of usage comes from POSIX.
To obtain the list of commands, after starting Weasis, open a local telnet session of the OSGI Console and type lb for getting the list of bundles and their state or type help for getting all the available commands:
telnet localhost 17179

Trying 127.0.0.1...

Connected to localhost.localdomain.

Escape character is '^]'.

____________________________

Welcome to Apache Felix Gogo

g!
List of Weasis commands
dcmview2d:layout
g! dcmview2d:layout
Select a split-screen layout
Usage: dcmview2d:layout ( -n NUMBER | -i ID )
  -n --number=NUMBER  select the best matching number of views
  -i --id=ID          select the layout from its identifier
  -? --help           show help
dcmview2d:mouseLeftAction
g! dcmview2d:mouseLeftAction
Change the mouse left action
Usage: dcmview2d:mouseLeftAction COMMAND
COMMAND is (sequence|winLevel|zoom|pan|rotation|crosshair|measure|draw|contextMenu|none)
  -? --help       show help
dcmview2d:move
g! dcmview2d:move
Pan the selected image
Usage: dcmview2d:move -- X Y
X and Y are Integer. It is mandatory to have '--' (end of options) for negative values
  -? --help       show help
dcmview2d:reset
g! dcmview2d:reset

Reset image display
Usage: dcmview2d:reset (-a | COMMAND...)
COMMAND is (winLevel|zoom|pan|rotation)
  -a --all        reset to original display
  -? --help       show help
dcmview2d:scroll
g! dcmview2d:scroll
Scroll into the images of the selected series
Usage: dcmview2d:scroll ( -s NUMBER | -i NUMBER | -d NUMBER)
  -s --set=NUMBER       set a new value from 1 to series size
  -i --increase=NUMBER  increase of some amount
  -d --decrease=NUMBER  decrease of some amount
  -? --help             show help
dcmview2d:synch
g! dcmview2d:synch
Set a synchronization mode
Usage: dcmview2d:synch VALUE
VALUE is (None|Stack|Tile)
  -? --help       show help
dcmview2d:wl
g! dcmview2d:wl
Change the window/level values of the selected image (increase or decrease into a normalized range of 4096)
Usage: dcmview2d:wl -- WIN LEVEL
WIN and LEVEL are Integer. It is mandatory to have '--' (end of options) for negative values
  -? --help       show help
dcmview2d:zoom
g! dcmview2d:zoom
Change the zoom value of the selected image
Usage: dcmview2d:zoom (set VALUE | increase NUMBER | decrease NUMBER)
  -s --set=VALUE        [decimal value]  set a new value from 0.0 to 12.0 (zoom magnitude, 0.0 => default, -200.0 => best fit, -100.0 => real size)
  -i --increase=NUMBER  increase of some amount
  -d --decrease=NUMBER  decrease of some amount
  -? --help             show help
dicom:get
g! dicom:get
Load DICOM files remotely or locally
Usage: dicom:get ([-l PATH]... [-w URI]... [-r URI]... [-p] [-i DATA]... [-z URI]...)
PATH is either a directory(recursive) or a file
  -l --local=PATH   open DICOMs from local disk
  -r --remote=URI   open DICOMs from an URI
  -w --wado=URI     open DICOMs from an XML manifest
  -z --zip=URI      open DICOM ZIP from an URI
  -p --portable     open DICOMs from configured directories at the same level of the executable
  -i --iwado=DATA   open DICOMs from an XML manifest (GZIP-Base64)
  -? --help         show help
dicom:close
g! dicom:close
Close DICOM files
Usage: dicom:close  (-a | ([-y UID]... [-s UID]...))
  -a --all           close all the patients
  -y --study=UID     close a study, UID is Study Instance UID
  -s --series=UID    close a series, UID is Series Instance UID
  -? --help          show help
dicom:rs
g! dicom:rs
Load DICOM files from DICOMWeb API (QIDO/WADO-RS)
Usage: dicom:rs -u URL -r QUERYPARAMS... [-H HEADER]... [--query-header HEADER]... [--retrieve-header HEADER]... [--query-ext EXT] [--retrieve-ext EXT] [--accept-ext EXT]
  -u --url=URL               URL of the DICOMWeb service
  -r --request=QUERYPARAMS   Query params of the URL, see weasis-pacs-connector
  -H --header=HEADER         Pass custom header(s) to all the requests
  --query-header=HEADER      Pass custom header(s) to the query requests (QIDO)
  --retrieve-header=HEADER   Pass custom header(s) to the retrieve requests (WADO)
  --query-ext=EXT            Additionnal parameters for Query URL (QIDO)
  --retrieve-ext=EXT         Additionnal parameters for Retrieve URL (WADO)
  --accept-ext=EXT           Additionnal parameters for DICOM multipart/related Accept header of the retrieve URL (WADO). Default value is: transfer-syntax=*
  --show-whole-study         when downloading a series, show all the other series (ready for download) from the same study
  -? --help                  show help
image:get
g! image:get
Load images remotely or locally
Usage: image:get ([-f file]... [-u url]...)
  -f --file=FILE     open an image from a file
  -u --url=URL       open an image from an URL
  -? --help          show help
image close
g! image:close
Close images
Usage: dicom:close (-a | ([-g UID]... [-s UID]...))
  -a --all         close all series
  -g --group=UID   close a group from its UID
  -s --series=UID   close an series/image from its UID
  -? --help        show help
weasis:info
g! weasis:info
Show information about Weasis
Usage: weasis:info (-v | -a)
  -v --version    show version
  -a --all        show weasis specifications
  -? --help       show help
weasis:ui
g! weasis:ui
Manage user interface
Usage: weasis:ui (-q | -v)
  -q --quit     shutdown Weasis
  -v --visible  set window on top
  -? --help     show help
acquire:patient
g! acquire:patient
Load Patient Context from the first argument
Usage: acquire:patient (-x | -i | -s | -u) arg
arg is an XML text in UTF8 or an url with the option '--url'
  -x --xml         open Patient Context from an XML data containing all DICOM Tags
  -i --inbound     open Patient Context from an XML data containing all DICOM Tags, decoding syntax is [Base64/GZip]
  -s --iurlsafe    open Patient Context from an XML data containing all DICOM Tags, decoding syntax is [Base64_URL_SAFE/GZip]
  -u --url         open Patient Context from an URL (XML file containing all DICOM TAGs)
  -? --help        show help
weasis:config (only at launch)
This command can be used only at launch, see Modify the launch parameters
Note
For identifying the commands at start-up, the symbol “$” must be added before the command (not required in the OSGI console). See examples below.
Warning
Special characters: A command containing special characters like ‘&’ or space must be within quotes or double quotes. Example:
dicom:get -w "http://localhost/weasis-pacs-connector/manifest?patientID=97026728&modalitiesInStudy=MR"Dicom Conformance
Compatibility of DICOM Transfer Syntax
| Transfer Syntax UID | Media Type | Description | Read | Write |
|---|---|---|---|---|
| 1.2.840.10008.1.2 | Implicit VR - Little Endian | yes | No | |
| 1.2.840.10008.1.2.1 | Explicit VR - Little Endian | yes | Yes | |
| 1.2.840.10008.1.2.1.99 | Deflated Explicit VR Little Endian | yes | No | |
| 1.2.840.10008.1.2.2 | Explicit VR Big Endian (Retired) | yes | No | |
| 1.2.840.10008.1.2.5 | RLE (Run Length Encoding) Lossless | yes | No | |
| 1.2.840.10008.1.2.4.50 | image/jpeg | JPEG Baseline (Process 1): Default Transfer Syntax for Lossy JPEG 8 Bit Image Compression | yes | Yes |
| 1.2.840.10008.1.2.4.51 | image/jpeg | JPEG Extended (Process 2 & 4): Default Transfer Syntax for Lossy JPEG 12 Bit Image Compression (Process 4 only) | yes | Yes |
| 1.2.840.10008.1.2.4.53 | image/jpeg | JPEG Spectral Selection, Non-Hierarchical (Process 6 & 8) (Retired) | yes | No |
| 1.2.840.10008.1.2.4.55 | image/jpeg | JPEG Full Progression, Non-Hierarchical (Process 10 & 12) (Retired) | yes | No |
| 1.2.840.10008.1.2.4.57 | image/jpeg | JPEG Lossless, Non-Hierarchical (Process 14) | yes | Yes |
| 1.2.840.10008.1.2.4.70 | image/jpeg | JPEG Lossless, Non-Hierarchical, First-Order Prediction (Process 14 [Selection Value 1]) | yes | Yes |
| 1.2.840.10008.1.2.4.80 | image/jls | JPEG-LS Lossless Image Compression | yes | Yes |
| 1.2.840.10008.1.2.4.81 | image/jls | JPEG-LS Lossy (Near-Lossless) Image Compression | yes | Yes |
| 1.2.840.10008.1.2.4.90 | image/jp2 | JPEG 2000 Image Compression (Lossless Only) | yes | Yes |
| 1.2.840.10008.1.2.4.91 | image/jp2 | JPEG 2000 Image Compression | yes | Yes |
| 1.2.840.10008.1.2.4.92 | image/jpx | JPEG 2000 Part 2 Multi-component Image Compression (Lossless Only) | yes | No |
| 1.2.840.10008.1.2.4.93 | image/jpx | JPEG 2000 Part 2 Multi-component Image Compression | yes | No |
| 1.2.840.10008.1.2.4.201 | image/jphc | High-Throughput JPEG 2000 Image Compression (Lossless Only) | yes | No |
| 1.2.840.10008.1.2.4.202 | image/jphc | High-Throughput JPEG 2000 with RPCL Options Image Compression (Lossless Only) | yes | No |
| 1.2.840.10008.1.2.4.203 | image/jphc | High-Throughput JPEG 2000 Image Compression | yes | No |
| Transfer Syntax UID | Media Type | Description | Read | Write |
|---|---|---|---|---|
| 1.2.840.10008.1.2.6.1 | mime type | RFC 2557 MIME Encapsulation | yes | No |
| 1.2.840.10008.1.2.4.100 | video/mpeg | MPEG-2 Main Profile Main Level | yes | No |
| 1.2.840.10008.1.2.4.101 | video/mpeg | MPEG-2 Main Profile High Level | yes | No |
| 1.2.840.10008.1.2.4.102 | video/mp4 | MPEG-4 AVC/H.264 High Profile / Level 4.1 | yes | No |
| 1.2.840.10008.1.2.4.103 | video/mp4 | MPEG-4 AVC/H.264 BD-compatible High Profile / Level 4.1 | yes | No |
| 1.2.840.10008.1.2.4.104 | video/mp4 | MPEG-4 AVC/H.264 High Profile / Level 4.2 For 2D Video | yes | No |
| 1.2.840.10008.1.2.4.105 | video/mp4 | MPEG-4 AVC/H.264 High Profile / Level 4.2 For 3D Video | yes | No |
| 1.2.840.10008.1.2.4.106 | video/mp4 | MPEG-4 AVC/H.264 Stereo High Profile / Level 4.2 | yes | No |
| 1.2.840.10008.1.2.4.107 | video/H265 | HEVC/H.265 Main Profile / Level 5.1 | yes | No |
| 1.2.840.10008.1.2.4.108 | video/H265 | HEVC/H.265 Main 10 Profile / Level 5.1 | yes | No |
Note
The latter groups of TSUIDs are opened by the default system application associated with the MIME type.
Supported “Photometric Interpretation” pixel format
| Photometric Interpretation | Description | Supported |
|---|---|---|
| MONOCHROME1 | grey level image description (high values=dark, low values=bright) | yes |
| MONOCHROME2 | grey level image description (high values=bright, low values=dark) | yes |
| PALETTE COLOR | pseudo color image description | yes |
| RGB | true color image description | yes |
| YBR_FULL | true color image description | yes |
| YBR_FULL_422 | true color image description | yes |
| YBR_PARTIAL_422 | true color image description (Retired) | yes |
| YBR_PARTIAL_420 | true color image description | yes |
| YBR_ICT | true color image description (JPEG-2000) | yes |
| YBR_RCT | true color image description (JPEG-2000) | yes |